The brief for this Semester is to produce three idents for a TV channel. I have yet to come up with any ideas and haven't yet chose the channel that I wish to use. I think that the project is going to be challenging as it is the first time I have animated anything using 3Ds Max.
Class Activity
In class we were asked to think about the most memorable corporate ident that we had seen on TV.
I think that the msot memorable idents I have seen have to be the slug animations on BBC 3.
Click this link to view some examples of these idents.
http://uk.youtube.com/watch?v=1zccNjxOaEY
I think these idents are the most memorable for me as i find the animations quite amusing. The channel shows a lot of comedy so the idents reflect this perfectly.
Tuesday, 27 January 2009
Tuesday, 20 January 2009
Week 12
In Week 12 I had nothing left to do other than check over my work. With the designs all finished I decided to check the parameters and properties of the images and altered them when necessary to achieve the best possible results.
Overall I feel that the project has been a success. I have managed to produce three images that I feel are of a fair standard. The final images have turned out as planned and are good representations of the original skecthes.
Week 11
This image shows the final scene for the month of November. I have re-worked the people in the crowd and have added the fireworks background.
The background was created using Adobe Photoshop. I took multiple images of fireworks and cut them all into one image. I also changed the colours to fit in with the rest of the scene.
 I re-worked the crowd by adding more detail to the figures. The image below shows where i have used soft selection to model the heads of the models. Starting with a sphere i then pulled out and depressed parts of the shape to achieve a rough head shape. The main areas of detail are the mouth, eyes, nose and the hat.

The background was created using Adobe Photoshop. I took multiple images of fireworks and cut them all into one image. I also changed the colours to fit in with the rest of the scene.
I re-worked the crowd by adding more detail to the figures. The image below shows where i have used soft selection to model the heads of the models. Starting with a sphere i then pulled out and depressed parts of the shape to achieve a rough head shape. The main areas of detail are the mouth, eyes, nose and the hat.A lot of the November image was created via means of experimentation. I like the look of the image although it may not be the most technical of the three scenes. I am a lot happier with the final outcome of this particular scene as i was worried originally that i would not be able to create a convincing image.
Week 10
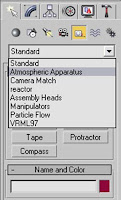
To create the fire i used a Sphere gizmo. These can be found by selecting the helpers icon. Once selected there is a drop down menu where you need to choose the Atmospheric Apparatus option.
This week i have drawn up a table to show you step by step how to create the fire. Click on the table to view it in a larger scale.

This week i have drawn up a table to show you step by step how to create the fire. Click on the table to view it in a larger scale.


Week 9
As planned the July scene was finished by week 8. This week i started experimenting with creating realistic looking fire and creating believable people. From what i have produced the outcome has not been to my liking and i feel as though i need to work more with soft selection to achieve a better quality when modeling people.
Looking at the image below the crowd looks very simple and basically look snowmen with one sphere on top of another for the body and head. The fire effect is ok but i think more can be done to achieve a higher level of realism.

Looking at the image below the crowd looks very simple and basically look snowmen with one sphere on top of another for the body and head. The fire effect is ok but i think more can be done to achieve a higher level of realism.
Week 8

 The water
As you can see i decided to change the water for my final image. The methods i used to create the water were the same as those which i used to previously.
I started with a simple plane to which i added a noise modifier. This time around i didn't raise the settings as high so that the deeps and peeks in the water were further apart.
With the properties of the noise modifier now set i felt the the plane still looked to be too rough. To compensate this i added a mesh smooth modifier. This appears to make the pool look a lot calmer.
With this second attempt at creating the water i also experimented more with materials. In the material editor window i chose to play around with the Raytrace parameters to achieve a reflection in the water.
 This screen shot shows the parameters, options and colours which i selected to create the custom material.
At first when i applied these settings i was worried that they had not worked. After some time i realised that in order to get a decent reflection i needed to add an image in the background.
I wanted a reflection of clouds in the pool so that is what i searched for. I felt that the background image shown in the final scene was the best image for the composition.
Compared to my first attempt, the water in the final image looks alot more realistic. I think that if you spend that little bit of extra time on producing aspects of your work the outcome can be alot better, and that is what i did.
Week 7
This is the very first image showing the water effect which i had created. I do like the effect but i am not to sure about the outcome and feel that the look of the water would be better suited to a beach scene. The water in a swimming pool is much smoother with hardly any current at all. As well as this the water appears to have no reflection. I may decide to change the water once i have completed other aspects of the design.

 The sun loungers

Throughout the week i have continued with the idea and have added some new objects. These objects are the umbrella and the sun loungers.
 The umbrella
The umbrella started out as a sphere with 32 segments. To get the umbrella shape you then have to convert the sphere into a hemisphere by simply selecting the option in the menu bar.
I needed to convert the shape into an editable Poly and then delete the bottom to get a recognisable umbrella shape.

 With the basic shape completed i wanted to make the object more realistic by protruding sections to simulate the frame work of the umbrella.
To do this i used the line selection tool in the top view to select parts of 16 lines around the hemisphere. There are 32 lines around the hemisphere, so to get equal spacing i selected every other line. Once all of the line parts are selected use the loop option as it will then highlight the whole of each line.
With the lines selected i simply used the scale tool to drag them out to create the protrusions. The shape looked a bit rough at first so i added a chamfer amount of 0.1 and then applied a mesh smooth modifier.
To finish off the object i will go on to model a simple stand. I intend to use basic shapes as a stand shape is not very complex.
The sun loungersIn theory i thought the sun loungers would be easy to make. During the process i found it very hard to angle the shapes to create the slats for the back rest. The slats are box shapes and the frames are made up of cylinders. Once i had modeled one i then duplicated it to achieve the second. All that was left to do was place them within the image.
I feel that the idea of the loungers work well within the composition of the image. The objects are simple but appear effective.
Week 6
My next idea for the month of July was to create a pool scene. This relates to the idea of holidays. With a little bit of practice using 3Ds Max, i now felt that i should attempt to create a scene using more complexed methods compared to those used to create my October scene.


The screen shot shows the idea in progress. There are aspects of this idea that i think need improving to create a more believable image. I plan to finish this idea by Week 8.
Subscribe to:
Comments (Atom)