Tuesday, 20 January 2009

Week 7

This is the very first image showing the water effect which i had created. I do like the effect but i am not to sure about the outcome and feel that the look of the water would be better suited to a beach scene. The water in a swimming pool is much smoother with hardly any current at all. As well as this the water appears to have no reflection. I may decide to change the water once i have completed other aspects of the design.


Throughout the week i have continued with the idea and have added some new objects. These objects are the umbrella and the sun loungers.

The umbrella

The umbrella started out as a sphere with 32 segments. To get the umbrella shape you then have to convert the sphere into a hemisphere by simply selecting the option in the menu bar.


I needed to convert the shape into an editable Poly and then delete the bottom to get a recognisable umbrella shape.


With the basic shape completed i wanted to make the object more realistic by protruding sections to simulate the frame work of the umbrella.


To do this i used the line selection tool in the top view to select parts of 16 lines around the hemisphere. There are 32 lines around the hemisphere, so to get equal spacing i selected every other line. Once all of the line parts are selected use the loop option as it will then highlight the whole of each line.


With the lines selected i simply used the scale tool to drag them out to create the protrusions. The shape looked a bit rough at first so i added a chamfer amount of 0.1 and then applied a mesh smooth modifier.


To finish off the object i will go on to model a simple stand. I intend to use basic shapes as a stand shape is not very complex.

The sun loungers

In theory i thought the sun loungers would be easy to make. During the process i found it very hard to angle the shapes to create the slats for the back rest. The slats are box shapes and the frames are made up of cylinders. Once i had modeled one i then duplicated it to achieve the second. All that was left to do was place them within the image.

I feel that the idea of the loungers work well within the composition of the image. The objects are simple but appear effective.


Week 6

My next idea for the month of July was to create a pool scene. This relates to the idea of holidays. With a little bit of practice using 3Ds Max, i now felt that i should attempt to create a scene using more complexed methods compared to those used to create my October scene.


The screen shot shows the idea in progress. There are aspects of this idea that i think need improving to create a more believable image. I plan to finish this idea by Week 8.


Thursday, 23 October 2008

Week 5

After having finished my first complete image i feel that i am coping ok with the subject. At this point in time the only thing holding me back is my knowledge of the 3Ds Max program. I feel that it will take me some time to acheive a fair amount of confidence using the program. There are two ideas i have to continue my project. I am not sure how they will compare to my design for October.

Since last week the design for October has progressed slightly. Additions to the design include the storks which are created from cylinders that have been modeled using the soft selection tools. I have also added the floor and walls to create a base for the pumpkins. These are made up of boxes with custom textures.

Week 4

Initial Sketches:


I think out of all the tutorial sessions i have managed to accomplish the most in this weeks session. I have managed to create the basis of my first month's design. Following on from last week i now have three completed pumpkins with internal omni lights to represent candles.

Since last week i have converted the shape into an editable poly and deleted sections to create the mouth and eye holes. After these were removed i used a shell modifier to create the flesh and a smooth modifier to give a rounded finish.

Week 3

Now with some knowledge i decided to look at some tutorials online. Going with one of my ideas for one the months i decided to search for some tutorials on how to create a realistic pumpkin. After searching for ages and finding nothing i decided to experiment with the program to see if i could create something that resembled a pumpkin shape.

After a couple of failed attempts and some playing around with the soft selection i managed to create the basic shape.


I started out by creating a normal sphere from the shape panel. Once i had the sphere i converted it into a editable mesh. Using the edge selector and soft selection i selected some of the vertical lines in the top view. When the lines were highlighted i was able to move sections of the sphere back to give the bumpy appearance of a pumpkin.

The shape may not look like much but i am pretty happy with the way its going so far. Hopefully by next weeks tutorial it will have progressed and i will have a decent looking pumpkin.

Week 2

I felt alot better about the subject going into the second week and found that i now had some kind of knowledge of 3Ds Max. Rather than stick with just an average fruit bowl i started to experiment by trying to incorporate other objects to create a scene.

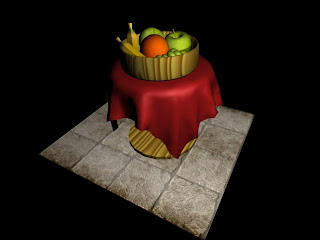
The above image shows my final attempt at making the fruit bowl. I'm pretty pleased with the outcome after ditching the dodgy checkered board. I think the whole table and cloth idea works alot better.


How it was made:


Table: The table is simply made up of three cylinder shapes that have been re-sized to make the three components of a simple table. Once i had the shape i applied the wood material which already exists on the program.

Floor: The floor is simply a box shape with an applied material. I found a picture of some stone flooring and then transferred it into paint. From there i saved the image as a bitmap. When applying the material i simply selected bitmap from the list of materials and added the image.

Table cloth: The table cloth was created from a simple rectangle. It gained its shape though the use of modifiers. The whole process is simple but it gives a great result.

The two modifiers used to create the shape are garment maker and cloth. When selecting garment maker you can alter the density. The higher the density the more creases there will be in the fabric. Thus making the whole thing more realistic. Once the density is set you can then add the cloth modifier. By clicking on object properties you can add the object that the cloth will be draped over, or the collision object as its called in the menu. In my case it was the top cylinder on the table. Click OK then the screen will close. All that is left to do is press the simulate button and watch the cloth form over the table.


Mood Boards


Sunday, 28 September 2008

1st Post

I didn't really know what to expect from 3D modelling before the first lecture. I now think that this will be a module that i will find interesting although it will be a challenge. I have no past experience of using 3D Studio Max but I'm sure i will have some fun learning how to use the program.

As for the fruit bowl, that is a work in progress. At the moment the most I've managed to come up with is a few spherical shapes that resemble some apples and grapes. I'm sure it will improve in time with a fair amount of practice. Pictures coming soon .............


Work in progress:


The addition of grapes:


Favourite Month
My favourite month is May. This is when i get a chance to relax after a hectic few weeks of getting all my work handed in. It is nice to be able to chill out knowing that everything is completed and that you have the holidays to look forward to.


Research into 3 different months
These spider diagrams show events that happen in these three months as well as anything else related to that month.